Maintaining starting battery while Dry Camping.

Post your general and technical information, questions or responses in this forum. Viewing messages is open to all with no registration or log-in required. Prior to posting a new message or a response to an existing message, registration or login is required. Please do not post FOR SALE or WANTED ads in this section!

Moderator: bfadmin

User avatar
cmeadows
Posts: 156
Joined: Sat Mar 02, 2013 5:54 pm

Maintaining starting battery while Dry Camping.

Post by cmeadows »

Oliver,

Wow, you *are* serious about your AV experience! The robotic arm for the TV sounds cool but also functional.

Some of the higher-end radios are using static ram for presets that survive power disconnects. We move around too much for radio presets to be useful. Like you, we also use the USB port. When a song comes on that doesn't fit the mood, road, location or season, we press the "gong" button and advance to the next track.

On our spring break trip last year, we were listening to a ballgame on the radio. The sound was bad and we couldn't hear the announcer very well. When I pulled the speakers, there was no foam remaining in the speaker's foam-rolled suspension.

I wanted a really good sound system but for dry camping energy conservation, that meant a compromise of very efficient speakers and no external amplifier. I was very pleasantly surprised with the new speakers in both sound quality and capable quantity. The Pioneer radio we installed cost about the same as my first aftermarket radio—a Pioneer SuperTuner that I bought as a teenager. So, yes, we are again very much in our teenage mentality! :)
Attachments
Ford factory speaker -- no foam suspension.jpg
Ford factory speaker -- no foam suspension.jpg (167.69 KiB) Viewed 13437 times
Chuck & Laura Meadows
'99 24RB PSD
User avatar
stevek
Posts: 1184
Joined: Wed Mar 14, 2012 5:33 pm

Post by stevek »

Well, I got radio out.
Was kind of hard to do. Would not budge with removal keys in place.
One thing I could not get a good grip.
So I took off engine cover, reached under and felt back of radio and push it out easily.
Image
Note it has an IPOD connector.
Also if I was going to install a subwoofer, and suggestion how I would hook up?
Steve
2011 Born Free 22 foot RSK, rear side (corner) kitchen, E350, 29k miles.
Our first motorhome. Lots to learn. Thanks.
CA/OR border
User avatar
stevek
Posts: 1184
Joined: Wed Mar 14, 2012 5:33 pm

Post by stevek »

One more thing...
Before I get too carried away.
Just to be on the safe side..
What other options to maintain starting battery when dry camping.

Hook up a trickle charger to inverter?
Install AMP-L-START or equivalent recommended by Mel?
I am new to all this, so give me some other options?
Steve
2011 Born Free 22 foot RSK, rear side (corner) kitchen, E350, 29k miles.
Our first motorhome. Lots to learn. Thanks.
CA/OR border
User avatar
cmeadows
Posts: 156
Joined: Sat Mar 02, 2013 5:54 pm

Maintaining starting battery while Dry Camping.

Post by cmeadows »

Steve,

Removing the doghouse to get to the back of the radio was a good idea. :)

If you don't use the chassis battery for anything, it should be fine without any form of charger attached while you are dry camping. After you install a switch to power your in-dash radio from the coach batteries, your chassis battery needs will likely be reduced. Just remove all chargers and accessories from the 12v dash outlets, turn off the dome lights that come on with the front doors, and limit the use of the ignition switch for anything while dry camping. About the only remaining parasitic loss on the chassis battery would be the radio presets and, as Oliver pointed out, that can be switched to the coach as well. If your radio has an off switch (yes, that sounds silly but my new radio doesn’t have a power switch) you might be able to leave your radio powered on the coach batteries indefinitely (Jensen pins #8 and #15).

Sub-woofers are the least energy efficient device in an audio system. They consume lots of power creating low sound waves and vibrations. To run a sub-woofer, you will need an amplifier, sub-woofer & enclosure, heavy wire and lots of battery power. To hook it up to your Jensen, it looks like pins #9, #10 and #20 provide the sound signals and #14 could be used as a relay trigger to turn on the amp with the radio.
Chuck & Laura Meadows
'99 24RB PSD
User avatar
stevek
Posts: 1184
Joined: Wed Mar 14, 2012 5:33 pm

Post by stevek »

Hi Chuck, when I pulled the radio, it had a tag on top with Wire Colors.
It listed all the speaker wire colors and where they went.
And it listed the 5 power wires as follows..

Yellow..+12 V battery
Red.....+ 12 VDC switched
Black....Ground
Blue.....12 volt out/ 100 MA
Orange/white...Illumination/ Dash light

So I cut into the RED wire? Or Yellow?

Appreciate your help..
For I know nothing.... HAHA..
Steve
2011 Born Free 22 foot RSK, rear side (corner) kitchen, E350, 29k miles.
Our first motorhome. Lots to learn. Thanks.
CA/OR border
User avatar
cmeadows
Posts: 156
Joined: Sat Mar 02, 2013 5:54 pm

Maintaining starting battery while Dry Camping.

Post by cmeadows »

Steve,

You know way more than you think!

The yellow wire is for memory presets and clock
The red wire — this is the one you want—it powers the radio
The blue wire is for antenna UP/DOWN control (unused—no need to switch)
The black is ground and grounds are common (no need to switch)
The orange/white may be tied into your headlight switch (probably can live without)

First run this test. Turn on your headlight switch and see if the radio illuminates. If it lights up, this would be the "Orange/white...Illumination/ Dash light" — see if you can operate the radio without it.

Cut the red wire. Then run this test.
With the ignition key removed, run a temporary jumper wire from a battery source 12v positive (+) to the radio and see if everything works as it should. For this test, attach a short piece of wire to the red lead going to the radio. Strip only about 1/16 inch of the insulation from the other end to barely expose the wire and then hold it on the center post of your 12v accessory outlet on the dash—the center post is 12v positive (providing that your 12v accessory outlet remains hot with the key removed—if not, find another 12v positive source without turning on the key).

If everything works as it should with just the red wire powered from a separate source, then this is the only wire that you need to switch to coach power.

Oliver mentioned another solution—to tie both the red and yellow wires together and run through the switch to eliminate the parasitic loss of the memory circuit. This is optional and depends mostly on how much battery drain you may have experienced while your coach was setting around unused. It also matters if you use the clock and memory presets—if so, leave the yellow wire intact and only switch the red.
Chuck & Laura Meadows
'99 24RB PSD
User avatar
stevek
Posts: 1184
Joined: Wed Mar 14, 2012 5:33 pm

Post by stevek »

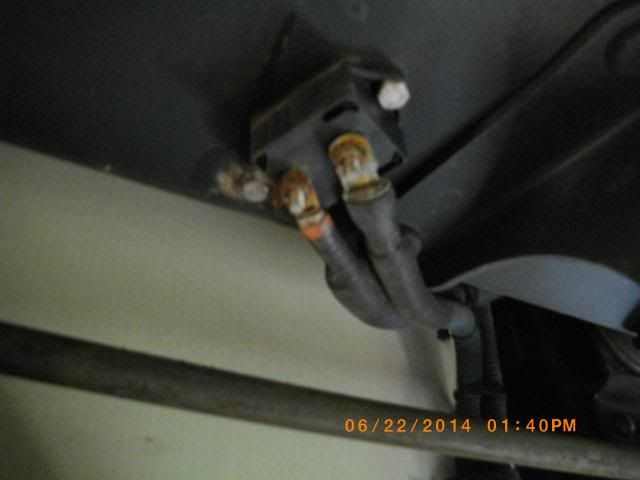
Chuck.... I have not cut red wire yet to the radio yet.
Was looking for a 12 VDC source first.
My disconnect switch is located by the coach steps and door.
When I crawl underneath, I see this line running from the switch.
I used my volt meter and got a 12.5 volt reading.
What about me tapping into one of these lugs?
Negative thing it is exposed to the elements.
What is that thing? Relay? Circuit Breaker? Thanks.
Image
Steve
2011 Born Free 22 foot RSK, rear side (corner) kitchen, E350, 29k miles.
Our first motorhome. Lots to learn. Thanks.
CA/OR border
jobrien

Post by jobrien »

That "might" be the auxiliary start. Allows you to start the couch from the house batteries.
tomzleapin
Posts: 485
Joined: Sun Jun 20, 2010 9:15 am

Post by tomzleapin »

It's a fuse. Some are self resetting. I don't know if that's the case for this one.
Tom
2005 24' RB
Towing 2016 Mini Cooper convertible on tow dolly
New Hope, MN
User avatar
cmeadows
Posts: 156
Joined: Sat Mar 02, 2013 5:54 pm

Maintaining starting battery while Dry Camping.

Post by cmeadows »

Steve,

It's a fuse . . . and a fine place to attach a power source for your radio. Be sure to install a 15 amp inline fuse on your new wire close to where you make the connection. You could run a short wire inside to the area under the driver's step and install the fuse there where it will be protected from the elements. To protect your new inline fuse, make the connection under the coach last after you have finished running the wire.

After you make your connection with a good quality ring terminal connector, you might want to spray-soak the external fuse and your new wire with some of this:

Lynx/Battery terminal protection spray
http://www.autozone.com/autozone/access ... 95996_0_0_

When you do cut the red wire leading to the radio, leave yourself plenty of slack on either side to make your connections.
Chuck & Laura Meadows
'99 24RB PSD
User avatar
stevek
Posts: 1184
Joined: Wed Mar 14, 2012 5:33 pm

Post by stevek »

Thanks.
Gotta buy a few things.
Will let you know when I get it done.

Another thing I was thinking about, why not just hard wire the Radio to the Coach Batteries?
Not that I plan on doing this.
Just curious.
Would be a lot easier for some people.
Steve
2011 Born Free 22 foot RSK, rear side (corner) kitchen, E350, 29k miles.
Our first motorhome. Lots to learn. Thanks.
CA/OR border
User avatar
Mike Jean Bandfield
Posts: 513
Joined: Sun Aug 14, 2005 3:43 pm

Post by Mike Jean Bandfield »

stevek wrote:Another thing I was thinking about, why not just hard wire the Radio to the Coach Batteries?
It wouldn't turn off with the ignition switch which might bother some. And you'd have to decide whether to wire it in front of or behind the battery cutoff switch - maybe the presets in front and the on-off power behind?
stevek wrote:Would be a lot easier for some people.
IMHO, radios shouldn't be this complicated. :?
Mike & Jean
2005 26' RSS Diesel
oliverpsmile
Posts: 271
Joined: Thu Dec 18, 2008 2:46 pm

Post by oliverpsmile »

Steve

In the vicinity under the house entrance (see you picture) there is one bolted connection De-energized when the battery switch is off and energized when the battery switch is ON. I used it to run my wire to the radio. Although i have cut off switch at the dash board the main switch is my back up for avoiding the drain of the house batteries.
Oliver P Smile
2005 26ft RSB
Tahoe
Posts: 128
Joined: Sat May 23, 2015 2:59 pm

Re: Maintaining starting battery while Dry Camping.

Post by Tahoe »

After our first trial weekend trip we wanted to play the radio, but didn't want to drain the chassis battery. Saw this post and today in less than an hour made the conversion. First I checked the radio schematic on line, and on the 2001 you want to tap into the yellow/black wire as this is the switched source. I pulled the radio, tapped into that wire and ran 2 wires to SPDT switch I located under the dash within reach. I ran a fused wire from the fuse pictured earlier in this thread up into the wire tray by the drivers step, and the up to the switch I installed. All neat and tidy and it works perfectly. I'm going to keep the stock radio for now, but plan on upgrading the speakers next and the Kenwoods mentioned earlier look great.
Russ and Denise
2002 24RB
User avatar
stevek
Posts: 1184
Joined: Wed Mar 14, 2012 5:33 pm

Re: Maintaining starting battery while Dry Camping.

Post by stevek »

I would be interested when you do the speaker upgrade and would like to do the same.
Maybe you could start a separate thread. Thanks.
Steve
2011 Born Free 22 foot RSK, rear side (corner) kitchen, E350, 29k miles.
Our first motorhome. Lots to learn. Thanks.
CA/OR border
Post Reply

Return to “General and Technical Information, Questions, and Responses”